There’s a universal pleasure in slipping into a bed with crisp, smooth, hotel-quality sheets. It’s a small luxury that signals the end of a long day and the start of a restful night. But how do you achieve that five-star feel at home? The secret isn’t a mystery; it’s a hot, steamy one. Mastering a few key Steam Ironing Tips For Bedding can transform your laundry chore into a satisfying ritual, and your bed into a sanctuary. Forget wrestling with wrinkled messes—I’m here to guide you through the process, making it simpler and more effective than you ever thought possible.
Why Should I Bother Steam Ironing My Bedding Anyway?
Let’s be honest, ironing a king-size fitted sheet can feel like a Herculean task. So, is it worth the effort? Absolutely. A good steam iron does more than just flatten creases.
The high heat and penetrating steam work together to kill lingering bacteria, dust mites, and allergens that might survive a regular wash cycle. This is fantastic news for allergy sufferers and anyone who loves the feeling of impeccably clean linens. Furthermore, the process smooths and seals the fabric fibers, making them feel softer against your skin and helping them last longer by reducing friction and wear. It’s not just about aesthetics; it’s about hygiene and comfort.
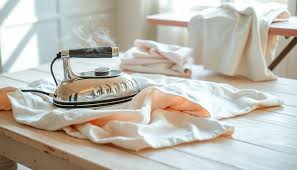
Choosing Your Weapon: What to Look for in a Steam Iron for Bedding
Not all irons are created equal, especially when you’re tackling large-scale projects like bedding. To make the job easier, your steam iron should have a few key features.
- High Steam Output: Look for a model with a powerful continuous steam function and a “steam burst” or “shot of steam” button. This is your best friend for tackling stubborn creases in thick fabrics like linen or high-thread-count cotton.
- Large Water Tank: Constantly refilling a tiny tank is a real drag. A larger, transparent water tank (at least 10 ounces or 300ml) means less interruption and a more fluid workflow.
- A Quality Soleplate: The part that touches the fabric matters immensely. Ceramic or stainless steel soleplates with plenty of steam holes glide effortlessly and distribute heat evenly.
- Variable Temperature Settings: Different bedding materials require different levels of heat. A reliable, clearly marked temperature dial is non-negotiable. You can learn more about finding the perfect model in our guide to the Best Steam Irons for Home Use.
The Masterclass: Your Step-by-Step Guide to Perfectly Pressed Sheets
Ready to turn your wrinkled linens into swathes of smooth perfection? Follow these steps for flawless results. Our essential steam ironing tips for bedding start long before the iron even heats up.
Step 1: Start with Damp Linens
This is the golden rule. Never try to iron bone-dry bedding. You’ll be fighting a losing battle against set-in wrinkles.
- Pull your sheets, pillowcases, and duvet cover from the dryer while they are still slightly damp to the touch.
- If they’ve dried completely, don’t worry. Fill a clean spray bottle with water and lightly mist the fabric a few minutes before you begin ironing.
Step 2: Prepare Your Ironing Station
Set up your ironing board in an area with plenty of room to maneuver. For king-size items, you may want to place a clean, dry towel or sheet on the floor to catch the ends of the fabric and keep them from getting dirty. Fill your iron’s reservoir, preferably with distilled water.
Why Distilled Water? Tap water contains minerals that can build up inside your iron over time, causing clogs, spitting, and staining your fabrics. Using distilled water is the single best thing you can do to prolong the life of your iron and protect your bedding.
Step 3: Set the Right Temperature
Consult the care label on your bedding. This is your most trusted source of information. As a general guide:
- Linen & High-Thread-Count Cotton: High heat, lots of steam.
- Percale & Sateen Cotton: Medium-high heat.
- Microfiber & Bamboo Blends: Low to medium heat. Start low and increase if needed.
Step 4: Master the Technique
Now for the main event. The key is a systematic approach.
- Pillowcases: These are your warm-up. They’re small and easy. Start with the seams and iron towards the center. Iron both sides. Fold neatly and set aside.
- Fitted Sheets: The dreaded item! The trick is to focus on the flat center part first. For the elasticated corners, drape a corner over the square end of your ironing board, pull it taut, and press carefully. Don’t iron directly over the elastic itself, as high heat can damage it.
- Flat Sheets & Duvet Covers: These are big, but the principle is simple: fold and conquer. Fold the sheet or duvet cover in half lengthwise. Iron one side completely, then flip and iron the other. If needed, you can fold it in half again. A powerful steam iron will penetrate through the layers.
How Do I Tackle a King-Size Duvet Cover Without Losing My Mind?
This is the big boss of bedding. The easiest method I’ve found is the fold-in-half technique. Lay the duvet cover on your board, folded lengthwise. Iron the top section. As you finish a section, gently pull the fabric towards you, letting the ironed part drape off the back of the board. Work your way down the entire length, then flip it over and repeat on the other side. It takes patience, but it works.
Pro-Level Steam Ironing Tips for Bedding
Ready to take your skills from good to great? Here are a few tricks I’ve picked up over the years.
- Iron in a Single Direction: Avoid scrubbing the iron back and forth in a circular motion. This can stretch and distort the fabric fibers. Use long, straight, gliding strokes.
- Let It Cool: After ironing, let the bedding lie flat on a clean surface or hang over a door for a few minutes to cool and set. If you fold and store it while it’s still warm and steamy, you’ll just create new wrinkles.
- Use the Steam Burst Strategically: For a particularly stubborn crease, hover the iron about an half-inch above the fabric and hit the steam burst button. Let the powerful steam penetrate the fibers, then press down with the soleplate to smooth it out.
As textile care specialist Catherine Lowe often says, “Steam doesn’t just remove wrinkles; it relaxes and resets the fibers. When you iron damp bedding, you’re working with the fabric’s natural state, not against it, which gives you that incredibly crisp, professional finish.”
Steam Iron vs. Dry Iron: Why Steam is Superior for Bedding
A dry iron relies solely on heat and pressure, which can sometimes scorch delicate fabrics and struggle with deep-set wrinkles in materials like linen. A steam iron is a game-changer. The moisture from the steam penetrates deep into the fabric fibers, relaxing them from the inside out. This makes them pliable and incredibly easy to smooth out with the iron’s hot soleplate. The result is a faster process and a far superior, longer-lasting finish.
|
Our Picks for the Best Steam iron in 2026
As an Amazon Associate, we earn from qualifying purchases.
|
||
| Num | Product | Action |
|---|---|---|
| 1 | HiLIFE Steamer for Clothes, Handheld Clothes Steamer with Large 300ml Tank, 1100W Strong Power, 30S Fast Heat-up, Garment Fabric Wrinkle Remover, Portable & Compact Travel Size ONLY FOR 120V (White) |

|
| 2 | BLACK+DECKER Easy Steam Compact Iron, IR06V, Dual Position Cord, TrueGlide Non-Stick Soleplate, Vertical Steam, SmartSteam |
|
| 3 | Portable Travel Steamer, 1200W Handheld Fabric Steamer for Clothes, 4 Modes with LCD Display, Powerful Wrinkle Remover for Home & Travel, 150ml Water Tank, 10S Fast Heat-Up, 180° Swivel Handle |
|
| 4 | Steamer for Clothes 1350W, Clothes Steamer for Home, Office, Travel, Upgraded 400ML Large Capacity Water Tank, Wrinkle Remover |
|
| 5 | Conair Handheld Garment Steamer for Clothes, Turbo ExtremeSteam 1875W Fabric Steamer, Portable Handheld Design, Strong Penetrating Steam, White/Champagne |
|
| 6 | Hamilton Beach Steam Iron for Clothes & Garment Steamer with Smooth Press Stainless Steel Soleplate, 1200 Watts, 8’ Retractable Cord, Black (14214) |
|
| 7 | BEAUTURAL Steamer for Clothes, Portable Handheld Garment Fabric Wrinkles Remover, 30-Second Fast Heat-up, Auto-Off, Large Detachable Water Tank |
|
| 8 | HiLIFE Steamer for Clothes, Portable Handheld Design, 240ml Big Capacity, 700W, Strong Penetrating Steam, Removes Wrinkle, for Home, Office(ONLY FOR 120V) |
|
| 9 | BLACK+DECKER Light ‘N Easy Compact Steam Iron, IR1020S, Stainless Steel Soleplate, Spray Mist, Anti-Drip, Auto Shutoff |
|
| 10 | HiLIFE Steamer for Clothes, Portable Handheld Design, 240ml Big Capacity, 700W, Strong Penetrating Steam, Removes Wrinkle, for Home, Office(ONLY FOR 120V)-Black |
|
Keeping Your Iron in Top Shape
Your steam iron is your partner in this process, so treat it well. Regular maintenance is key to its performance and longevity.
- Empty the Tank: Always empty the water tank after each use. Letting water sit inside can lead to mildew and mineral buildup.
- Run the Self-Clean Function: Most modern steam irons have a self-clean or anti-calc feature. Use it regularly (about once a month) according to the manufacturer’s instructions. This flushes out mineral deposits.
- Wipe the Soleplate: If you notice any residue or starch buildup, clean the soleplate when the iron is completely cool and unplugged. A cloth dampened with a 50/50 solution of distilled white vinegar and water works wonders. Get more detailed instructions on our Complete Guide to Cleaning Your Steam Iron.
Frequently Asked Questions
Q: Can I use a steam iron on all types of bedding?
A: You can use a steam iron on most common bedding fabrics like cotton, linen, and bamboo. However, always check the care label first. Avoid using high heat or steam on delicate materials like silk or certain synthetic blends unless the label specifically allows it.
Q: Is distilled water really necessary for my steam iron?
A: While not strictly mandatory, it is highly recommended. Using distilled water prevents the buildup of mineral scale (limescale) inside your iron, which can clog steam vents and shorten the appliance’s lifespan. If you live in a hard water area, it’s especially important.
Q: What if I don’t have an ironing board?
A: You can create a makeshift ironing surface by placing a thick, clean towel (preferably a light-colored one) over a sturdy, flat surface like a dining table or a countertop. Never iron directly on an unprotected surface.
Q: How often should I iron my bedding?
A: This is a matter of personal preference. For that consistently crisp, hotel-fresh feeling, ironing your bedding after each wash is ideal. The hygienic benefits of killing dust mites and bacteria are an added bonus to doing it regularly.
Q: Can I use the vertical steam function on my bedding?
A: The vertical steam function is excellent for a quick touch-up on a duvet cover or comforter that’s already on the bed. It can help release minor wrinkles from storage, but for a truly crisp, pressed finish, traditional ironing on a flat surface is much more effective.
Investing a little time in properly steam ironing your bedding can elevate your everyday comfort to a whole new level. It’s a small act of self-care that pays off every single night. By following these steam ironing tips for bedding, you’re not just doing a chore; you’re curating an experience—the experience of a perfectly made bed and a blissful night’s sleep.